One way to ensure consistency in your presentation is to make sure all your images are the same size. Having images of different sizes can make your presentation look messy and unorganized. It can also affect the alignment and spacing of your text and other elements. To avoid this problem, you can resize your images in PowerPoint. We’ll show you how to make all images the same size in PowerPoint below.
How to Make All Images or Shapes the Same Size in PowerPoint
Making all images the same size in PowerPoint varies, depending on which version of the software you are using. We’re using Microsoft 365, so expect some variation in other versions of the software (especially in older versions). These steps will also work for shapes you insert, too.
How to Make All Images or Shapes the Same Size Using Picture or Shape Tools
One way to improve the image sizing in PowerPoint is to use the Picture Tools or Shape Tools tab. To use Picture or Shape Tools to resize images or shapes in PowerPoint: Your shapes or images will now resize to match the height and width specifications you set. Make sure to double-check the sizing of each of your images to ensure there aren’t any issues.
How to Make All Images or Shapes the Same Size Using the Crop Tool
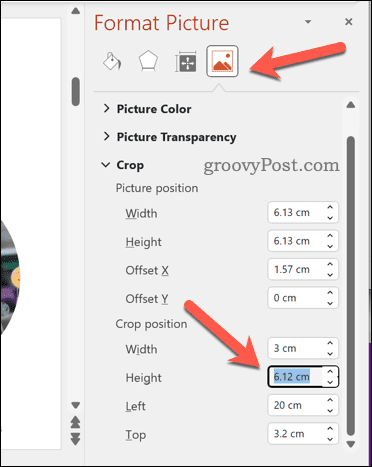
Another way to resize your images is to use the crop tool. You might prefer to do this to help you remove parts of your images that aren’t needed. However, you can also use the crop tool to help you resize some of your images to match the size of one other. For instance, if one image is larger than another, you can crop out parts of the larger image to match the size of the small one and repeat the process for other images. To use the crop tool on images in PowerPoint:
How to Make All Images or Shapes the Same Size by Manually Resizing Images Using Resize Handles
While it’s less accurate, you may prefer to use the resize handles around an image (or images) to help you resize them all to match. If you do this with multiple images selected, the images will resize as one, allowing you to get a close or identical match on sizing. However, you may find that it’s easier to do this one at a time. To manually resize images in PowerPoint:
Tips and Troubleshooting
Making all images the same size in PowerPoint can help you create more uniform and appealing slides. However, it also comes with some drawbacks and limitations that you should be aware of:
Resizing images can affect their quality and resolution. To avoid this issue, try to use high-quality images or compress them before inserting them. Alternatively, use vector graphics (such as SVG files) that you can resize without losing quality.Resizing images can change their aspect ratio (the ratio between width and height). To avoid this issue, try to use the crop tool or lock aspect ratio option when resizing.It can also affect the position and alignment of images on slides. Try to use align or distribute options after resizing to avoid this issue.
Editing Your PowerPoint Presentation
Making all of the images the same size in your PowerPoint presentation is one possible way to improve the appearance across different slides. You’ll want to ensure you test any changes before you save your file—if it doesn’t look good, revert the change. It would help if you also considered other changes, such as ensuring your PowerPoint slides are the right size. It’s also a good idea to think about how other items in your presentation appear. For instance, you might consider aligning objects in your PowerPoint presentation to improve consistency. Is the text hard to read? You can always update the font choices across your entire PowerPoint presentation next. Comment Name * Email *
Δ Save my name and email and send me emails as new comments are made to this post.
![]()


