You can also use ZIP and other archive formats to compress your files and maximize your disk space, especially on lower capacity devices or devices. Windows offers a built-in zipping tool, but you can also use third-party software like 7-Zip to achieve the same effect. Here’s how.
Using Windows File Explorer to Zip Files and Folders
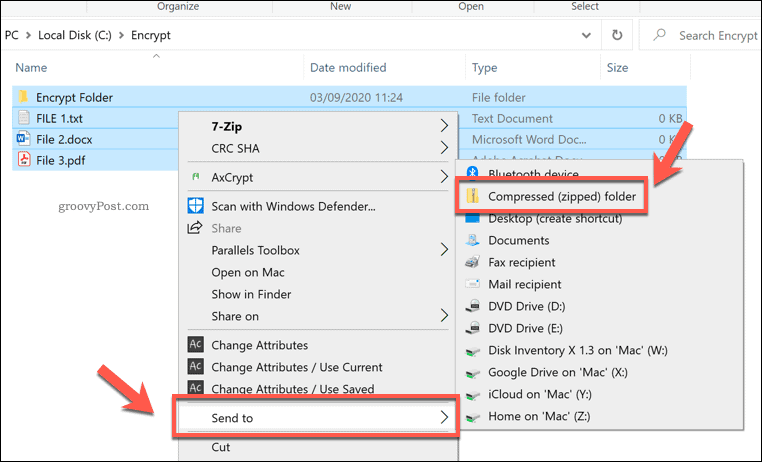
A method for creating zip files has been included with Windows since Windows XP. It allows you to create archives containing files and folders, regardless of the file type, combining them in a single zip file. This feature can be used from your desktop or from within the Windows File Explorer. This built-in method for creating and using zip files in Windows 10 is quite basic, however. There isn’t, for instance, any method to add passwords to your zip file, although it does allows you to open password-protected zip files. Zip files created using Windows 10 don’t allow for strong encryption, either. Using this method wouldn’t be a good option if you want to create secure files, for instance. If you want to use Windows File Explorer to create a zip file, select a number of files and folders, then right-click the selected file. From the options menu that appears, press Send To > Compressed (zipped) folder to create a new zip file containing those files and folders.
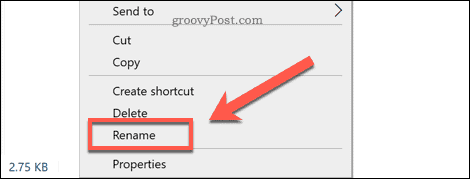
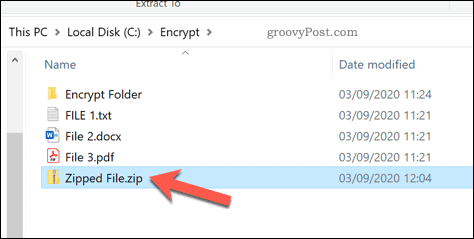
This will create a new zip file, named using one of the files in the selection. You can rename this by right-clicking the file and pressing the Rename option.
To access the file, double-click it. This will allow you to view the contents of the zip file in Windows File Explorer.
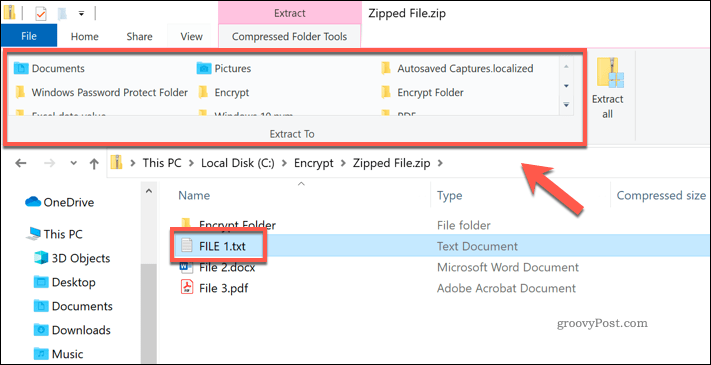
You won’t notice much difference between a typical folder and an open zipped file in Windows File Explorer. Windows is designed to ensure that browsing a zip files looks much like any typical folder. You can extract a single file or folder from the zipped file by selecting it, then pressing the Compressed Folder Tools tab on the ribbon bar. Under the Extract To box, you can select an available folder (for example, Documents) to extract it.
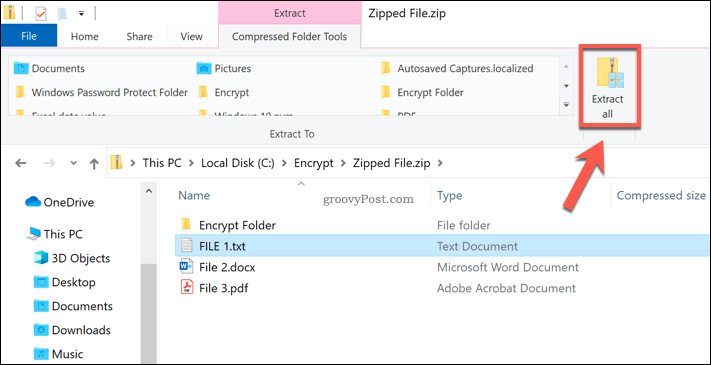
This will immediately place a copy of the selected file or folder in the new directory for you to access. You can also copy or drag the file to your desktop or to another Windows File Explorer window to achieve the same effect. To extract all files, press the Extract all button in the Compressed Folder Tools tab.
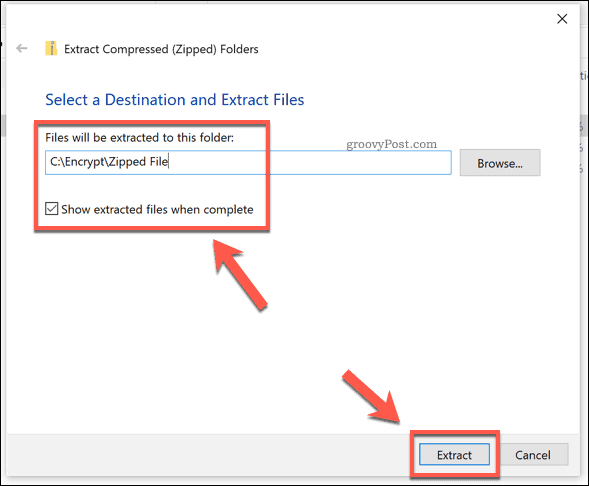
This will load the Extract Compressed (Zipped) Folders window. In the options box provided, provide a location to save the extracted files. If you want to immediately view the files afterward, make sure that the Show extracted files when complete checkbox is enabled. Press Extract to extract the files.
Once extracted, a copy of the files and folders within the zip file will appear in a new folder. If you enabled the Show extracted files when complete checkbox, Windows File Explorer will immediately open to the file location you selected.
Using 7-Zip To Zip Files and Folders in Windows 10
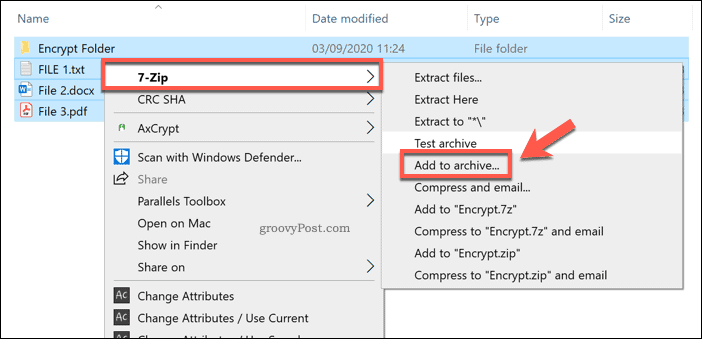
As an alternative to the built-in Windows File Explorer method, you can use 7-Zip to create new zip files instead. 7-Zip allows you to create archive files in almost all available archival formats. It offers strong support for encryption, password protection, file compression, and more. It’s also free and open-source, so you don’t have to pay to use it. To start using 7-Zip, download and install the 7-Zip software for Windows. Once installed, you can create a new zip file by selecting files and folders in Windows File Explorer or on your desktop, right-clicking the selected files, then pressing 7-Zip > Add to archive.
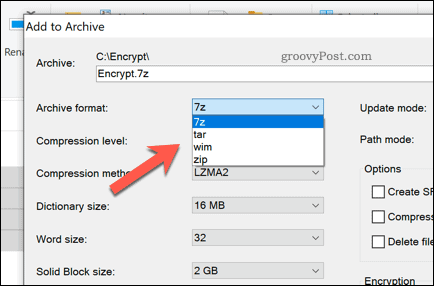
This will open the 7-Zip Add to Archive window, where you can customize your zipped file before it’s created. For instance, under Archive Format, you can select the standard ZIP file format, but you can also select TAR, WIM, and 7Z. For the best support (allowing almost all devices to open it), select ZIP. Otherwise, select 7Z, as this offers the best options for compression, file encryption, and more. If you select 7z, other users will need 7-Zip or another file client that supports these files to open it.
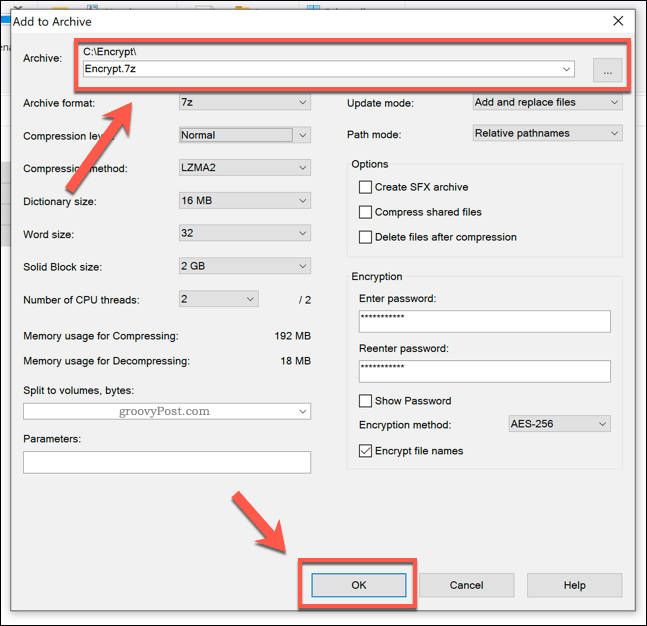
You can also use 7-Zip to create encrypted files. To do this, provide a password under the Encryption section. Make sure that AES-256 is selected from the Encryption method drop-down menu.
If you want to reduce the file size, you can increase the compression of the archive file by selecting an option from the Compression level drop-down menu. If you want no compression, select Store. For medium compression, select Normal. For maximum compression, select Ultra, but this will add additional time to the time taken to compress the file and open it afterward.
You’ll also need to give the file and name and select where you want to save it. Do this using the Archive box at the top. Once you’re ready to create the file, press OK.
This will create the new archive file for you in the archive file format you selected.
If you use the 7Z format or another available format, opening the file will open the 7-Zip File Manager. If you use the ZIP format, you can open this in Windows File Explorer like any other zipped file. You can also open it using the 7-Zip File Manager.
Other Ways to Compress and Encrypt Your Files
For most users, using Windows File Explorer to zip up your files and folders is the fastest option. It doesn’t offer the best compression rate or encryption, but it gets the job done, allowing you to combine files together in seconds. You can create ZIP folders on Mac just as easily, thanks to the built-in Finder app. There are also alternatives to 7-Zip and Windows File Explorer for Windows users, like WinZIP, which also supports file encryption and compression as standard.
![]()
