If your Windows 10 desktop is performing slowly since upgrading to a new version of Windows 10, there might be some simple reasons why that’s happening. Below are some things you should try after performing the upgrade.
Improve Your Systems Desktop Performance After Upgrading to Windows 10
Reset or Update BIOS An upgrade can introduce significant changes for better or worse. Your system might not yet be optimized or you might need to tweak your system defaults to get the device to jive with the upgrade. The Windows 10 1709 update for instance initially performed terribly on some systems I had access to. During and in anticipation of its launch, many brands released BIOS updates that fixed a lot of these performance issues. So, its one of the first things you should check after performing an upgrade. Resetting your BIOS defaults can also make things speedy again.
Update Essential Driver Software – Chipset, Display and Network Adapters. Just like your BIOS, sometimes you need to update critical driver software for your device. Driver software helps your hardware take advantage of the changes introduced in a new feature update and resolve any previous bugs that might have prevented the hardware from performing well. Disable Fast Startup Now, there is a little bit of irony here, but it actually turns out Fast Startup – a feature introduced in Windows 8 that optimizes boot time – can actually make your system slower. This is especially true if it’s an older model device released prior to Windows 10. Disabling it might increase boot times, but it will restore the performance of the desktop once Windows has started up. To do that, press Windows key + X, click Power Options > Additional power settings (under Related settings) > Choose what the power button does > Change settings that are currently unavailable > uncheck Turn on fast startup (recommended). Click Save changes.
Modify What’s Starting Up with Windows 10 Some services and processes that start with Windows 10 can impact the performance of the desktop. You can change that by removing services and background apps that startup with Windows 10. There are two places you can do this in Windows 10. Press Windows key + X. Click Task Manager. Click Startup tab. Select each item with exception to Windows Defender, then disable it. In Windows 10 1803, Startup has been been moved to Start > Settings > Apps > Startup.
Press Windows key + R. Type: msconfig then hit Enter. Select the Services tab. Check the box Hide all Microsoft services. Disable the remaining services.
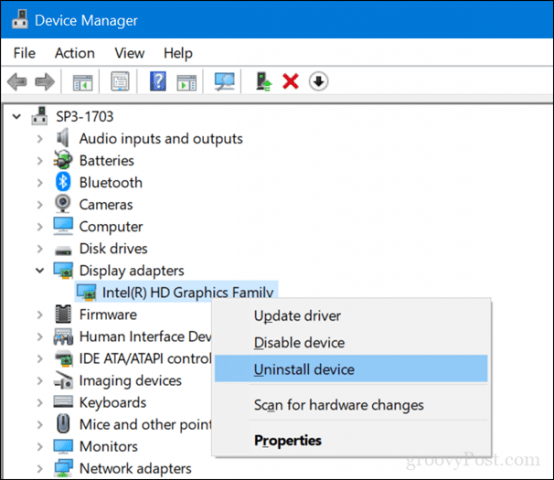
Open Start > Settings > Privacy > Background apps. Disable all background apps. Uninstall, Rollback or Update Your Display Driver We mentioned updating your display earlier, but this needs its own space. Another issue relating to optimization, your current graphics driver might be outdated and need to be updated or sometimes reinstalled. Windows 10 itself might installed a newer buggy driver. This has been occurring a lot in recent feature updates. Boot to the Windows 10 desktop. Press Windows key + X. Click Device Manager. Right-click the current display adapter. Click Properties. Click the Driver tab. Click Rollback driver if the option is available.
If those options are not available, right-click the display adapter instead, click uninstall. Check the box that says Delete the driver software for this device. Exit Device Manager then Restart. After restarting, open Start > Settings > Update & security then check for updates and install any available updates or download the latest graphics driver from the manufacturer’s website.
Run Disk Cleanup If you are low on space, this could actually be negatively affecting the performance of your desktop. There are several ways to free up space in Windows 10, which we covered in our previous article. Also, on the topic of freeing up space, browse C:\Windows\CbsTemp folder and look for any unusually large log files that might be stored there. If you see any, delete them. Turn Off, Restart or Reinstall Cortana Windows 10’s built-in digital system might be affecting the performance of the system and needs to be diagnosed. Press Windows key + X. Click Task Manager. Select the Processes tab, select Cortana then click End Task. Restart Windows 10. or Press Windows key + X. Click Windows PowerShell (Admin). At the command prompt, type the following command hit Enter, exit PowerShell then restart. Get-AppXPackage -Name Microsoft.Windows.Cortana | Foreach {Add-AppxPackage -DisableDevelopmentMode -Register “$($_.InstallLocation)\AppXManifest.xml”} You can turn off Hey, Cortana in Start > Settings > Cortana > Talk to Cortana. Conclusion Still not seeing any improvements in your system performance? Well, give some of these additional tips a try—they just might help:
Detach any non-essential hardware devices such as a printer, external drive, mobile devices; only keep your mouse and keyboard attached.Run the Start menu troubleshooter. Microsoft’s XAML based Start menu is still maturing and sometimes you might need to troubleshoot it to get it working.Update the Intel Rapid Storage driver. According to Intel, IRST improves the performance of computers with SATA disks while reducing power consumption. Check for updates for your keyboard and touchpad too. If you happen to be using a laptop, you might need to update the Synaptics touchpad drivers. These can also be found at the manufacturer’s driver download page.
Still not getting anywhere? Use the opportunity to rollback your system to a previous version if you just upgraded within the past 10 days or downgrade manually to your previous version. Check out our article about how to get older versions of Windows 10. Also, check out our previous article about speeding up Windows 10 for more tips. Hopefully, these can help you get your desktop’s inner Usain Bolt back to form. Let us know in the comments if they help. Comment Name * Email *
Δ Save my name and email and send me emails as new comments are made to this post.
![]()


